
Table of Contents
Open Table of Contents
Introduction
If you’ve been playing in the #looking-for-games channel on the Discord, you may have noticed a recent uptick in decks that seem to be four or five colours, with most of the spells limited themselves to just two. Well, that’s because the Gladiator community has recently discovered the wonders of disciplined splashing, and this article will let you into that secret. You, too, can learn the Way of the Splash, or at least understand why it’s not as insanely greedy as it might seem.
The Basics
First, I want to cover the basics of splashing: the why, where, what, and how. These are the most important things to know and will let you start your journey of getting to play all the best cards everywhere.
Why Splash?
So, what’s all the hype about? What’s the point? Put simply, what splashing is trying to accomplish is to raise the power level of the deck by increasing card quality. Normally, this comes with quite the cost. In Modern, you have Blood Moon to worry about. In Legacy, you have to deal with Wasteland as well. But here in Gladiator, there is little cost to forgoing your ever-trusty basics. This is both because the non-basic hate is almost non-existent, and we have enough untapped duals to lose very little tempo. Of course, there is some cost; the mana base is a bit more painful than that of your regular two-colour deck, and occasionally, you do lose valuable tempo to a land coming in tapped at an inopportune moment. However, in my experience playing with two colour decks that are splashing one or even two colours, the cards you’re splashing will win you the game more times than the mana base will lose it.
But then why not just play a full three-, four-, or even five-colour deck? The answer is twofold. First, there are diminishing returns. Say you have a two-colour deck and decide to splash. The difference in power level between the first card you’re adding and the first card you’re cutting is pretty large. This is especially true in Gladiator, where (through means like Strixhaven’s Mystical Archive) cards have been injected into the format that stand head-and-shoulders above the rest of the pool. However, the difference between the second card you’re adding and the second you’re cutting is smaller, because the second card you are adding is less powerful than the first, and the second card you’re cutting is more powerful than the first. This means that, theoretically, the second card you splash adds less power to your deck than the first, and the third card does less than the second, and so on. The majority of the benefit of having three or more colours is in those first few cards, because having ten cards in the third colour doesn’t elevate the power level much more than having just three. Secondly, the mana is much, much worse as you add more cards of a third colour. It makes a huge difference if you want your mana base to be able to cast cards in three different colours consistently on-curve versus just needing to focus on two and being able to not worry as much about the third colour. That’s why, maybe a bit paradoxically, I have found the mana base of two-colour decks splashing a further two colours to be much better at casting its spells on time when compared to full-on three-colour mana bases despite them having one less colour to worry about overall. For splashing to work out, however, you do need to implement it right, or else it might completely backfire.
What Splash?
Not every card is splashable. A card needs to fulfil a few key points to be considered.
It has to be powerful.
This is probably the most obvious point, but if a card isn’t a lot more powerful than the one you’re replacing, there won’t be much upside to the splash.
It has to be castable.
Don’t splash a card with more than one mana of its cost being of a single splash colour. Sheoldred, the Apocalypse may be a game-ender all by itself, but if you can’t cast it because you only drew a single black source, you’re going to have a rough time.
It has to be impactful late as well as on-curve.
Lightning Bolt is undoubtedly a powerful card. It is also castable, being only one mana. And yet, I would still recommend against splashing it. Why? Because it’s not always the slam dunk you need it to be, especially later in the game. Early, it is a house, but you can’t expect to be able to cast it on-curve every time. Every so often, you have to wait until turn five to draw the red source, and by then, its time may have already passed. This is the most important criteria in my opinion because I think it’s the most easily overlooked. Don’t splash a card where if you cast it on curve it’s bonkers but it’s kind of meh on turn six, because you won’t be able to cast it on curve every single time. There are plenty of cards that are always going to be good, or maybe especially good later, like the freshly unbanned Teferi, Time Raveler or Demonic Tutor. Absolutely do not forget this point when you’re figuring out what to splash, because even powerful cards may not be the right pick.
Finally, you also need to limit the number of cards you’re splashing. Otherwise, the chance of drawing an off-colour card you’re unable to cast rises to a degree that you might end up with a dead card in hand too often for it to be worth it. Furthermore, as discussed previously, the benefit of splashing decreases quite dramatically the more cards you splash. In my experience, you want to avoid splashing more than five or six cards. That does, of course, not mean that you have to splash exactly five cards; going into white for just Swords to Plowshares and Teferi, Time Raveler is more than okay. Don’t just splash cards for the sake of splashing; they need to have a meaningful impact on your deck.
How Splash?
Okay, so you know what you’re splashing, in what deck, and you hopefully even have a good reason to do so. But how do you splash? How do you construct a mana base that fulfils all the promises I made about much upside for little downside? The most important thing is that you want the splash to not impact your ability to cast your other spells. All of your lands absolutely need to tap for at least one of your base colours. That means, for example, no off-colour basics for Fabled Passage. You absolutely do not want to draw a Wastes that only casts one or two of your spells. If you’re splashing green and you want to play a Boseiju, it cannot replace the slot of a land, it must replace a spell. Otherwise, your ability to cast your spells is compromised, which is both incredibly detrimental and absolutely unnecessary. My personal approach is to first build a regular two-colour mana base, and then to replace the basics with untapped duals that cast your off-colour spells.
A good example is how I build the mana base for my Izzet midrange list, in which I’m splashing white and black. In my Standard Izzet manabase there are 12 red and 13 blue sources that just tap for a single colour, four tapped duals, nine (conditionally) untapped duals, and a single colourless land. In my Izzet + 2 manabase I’ve added five duals for each possible combination of base and splash colours. That means I’ve added 5 red-white, 5 red-black, 5 blue-white and 5 blue-black duals, and they all almost always enter untapped: a Shockland, a Painland, a Fastland, a Slowland and a MDFC. Checklands that aren’t tapping for both main colours enter tapped too often, because a lot of the lands with types got cut for untyped duals. There are still eight lands that are capable of adding red and blue, 3 just for red, 4 just for blue, and a further 4 that can produce 3 or more of your colours. The colourless land was cut entirely. Overall, the number of sources that tap for red or blue has not changed at all, but now there are thirteen sources that tap for the splash colour. While that might not sound like much (because for a full colour it isn’t), it’s still plenty to consistently cast your spells early enough that they’ll matter. You won’t cast your splashed spells on curve every single match, but that’s why you need to make sure that the spells you’re splashing are good, even if they are stuck in your hand for a while. It is also important to note that usually, you won’t have a card of your splash colour in hand, and it doesn’t matter if you can’t cast a splash card then. You do lose a bit of utility in your lands, but ideally that should be more than offset by the power of the cards you’re splashing. A manabase like this is built in a way that ensures that you can cast your spells in the main colours and that typically you’ll be able to cast your off-colour spells when you draw them.
Differences Between Base Colours
Another thing that doesn’t become apparent when you look at just the manabase is that you’re most likely already running cards in your deck that incidentally help you cast your off-colour cards, or at least let you get rid of them if you can’t. Before I go over the maths, I wanted to take a brief look at how different base colours affect the way you’re able to splash.

Green & Red
The best colours for splashing are (unsurprisingly) green and (maybe a little surprisingly) red. Green has its mana dorks that provide any colour of mana that you want to be playing anyway. Mila, also known as Dwaginz on the Discord, has been having success by splashing the black tutors, Tyvar, Jubilant Brawler, and Minsc & Boo, Timeless Heroes back when they were still legal, with just three black and three red duals in her Mono-Green Elves deck. This just goes to show how powerful mana dorks are and how you’re able to bend the rules of Magic with cards you’re already playing. Meanwhile, red mainly enables splashing with a surprising amount of incidental treasure production from cards like Professional Face-Breaker and Fable of the Mirror-Breaker. In addition, rummaging not only lets you dig towards the splash colour you’re currently missing, but it also lets you get rid of splash cards that are stuck in your hand. That’s how these colours let you get away with a bit more greed than would be advisable on paper; in practice, you’re able to work around issues with little to no effort.
Blue
Blue also does a lot of work when you’re splashing, especially when working together with one of the previous two colours. The cantrips let you both find the coloured sources you need and get rid of cards you may be unable to cast. Looting also has the same benefits as rummaging, as discussed above.
Black & White
Black and white probably have it the roughest when trying to splash, as neither of them has many cards that naturally help you splash. This is not to imply that you can’t splash if you have black or white as one of your base colours. For example, splashing has worked out very well for me in a Dimir midrange deck, but you might have to work a little harder than with other colours.
The Maths™
And then, finally, the maths. This section is by no means a necessary read if you just want to jump right into splashing, but if you want to have a more in-depth understanding of how consistent splashing really is and what you can change and tweak about it to make the numbers just right, this is the section for you.
General Mana Base Maths
First, I’ll go over the basics of the manabase maths in Gladiator, regardless of if you’re splashing or not. The maths I will be showing will be almost entirely based on this great article by Frank Karsten, so I do recommend giving it a read, but it’s not necessary for you to be able to understand this section. I will use the numbers in the 80-card column of this work multiplied by 1.25 because the numbers in the 99 card column are geared towards Commander and therefore factor in things that aren’t present in Gladiator like a free mulligan. Additionally, proportions are more important than absolute numbers1 for the simulation Karsten used, and the maths were also done for decks with effectively 43.75 lands. This means that the numbers for decks that are running fewer lands should be a bit lower, so I adjusted all the numbers down by one. After all that, these are what I ended up with:
| Mana cost | Example Spell | Number of coloured mana sources required |
|---|---|---|
| C | Ragavan, Nimble Pilferer | 23 |
| 1C | Ledger Shredder | 22 |
| CC | Counterspell | 34 |
| 2C | Laelia, the Blade Reforged | 19 |
| 1CC | Liliana of the Veil | 30 |
| 3C | Citystalker Connoisseur | 18 |
| 2CC | Questing Beast | 28 |
| 4C | Elesh Norn, Mother of Machines | 17 |
| 3CC | Baneslayer Angel | 24 |
| 4CC | Season’s Past | 23 |
So, what do these numbers actually mean? The numbers on the right are the number of coloured sources that you need to consistently cast a spell with a certain mana cost on curve. “Consistently” here means more than (89+mana value)% of the time, and “on curve” means when you have a number of lands equal to the card’s mana value. For example, if 30 out of 39 lands in your deck produce black mana, you can expect to be able to cast Liliana of the Veil over 92% of the time. This is a lot of black sources, and it’s why I and others advise against running too many double-pipped cards at mana value three across multiple colours.
Maths for the Splash Colours
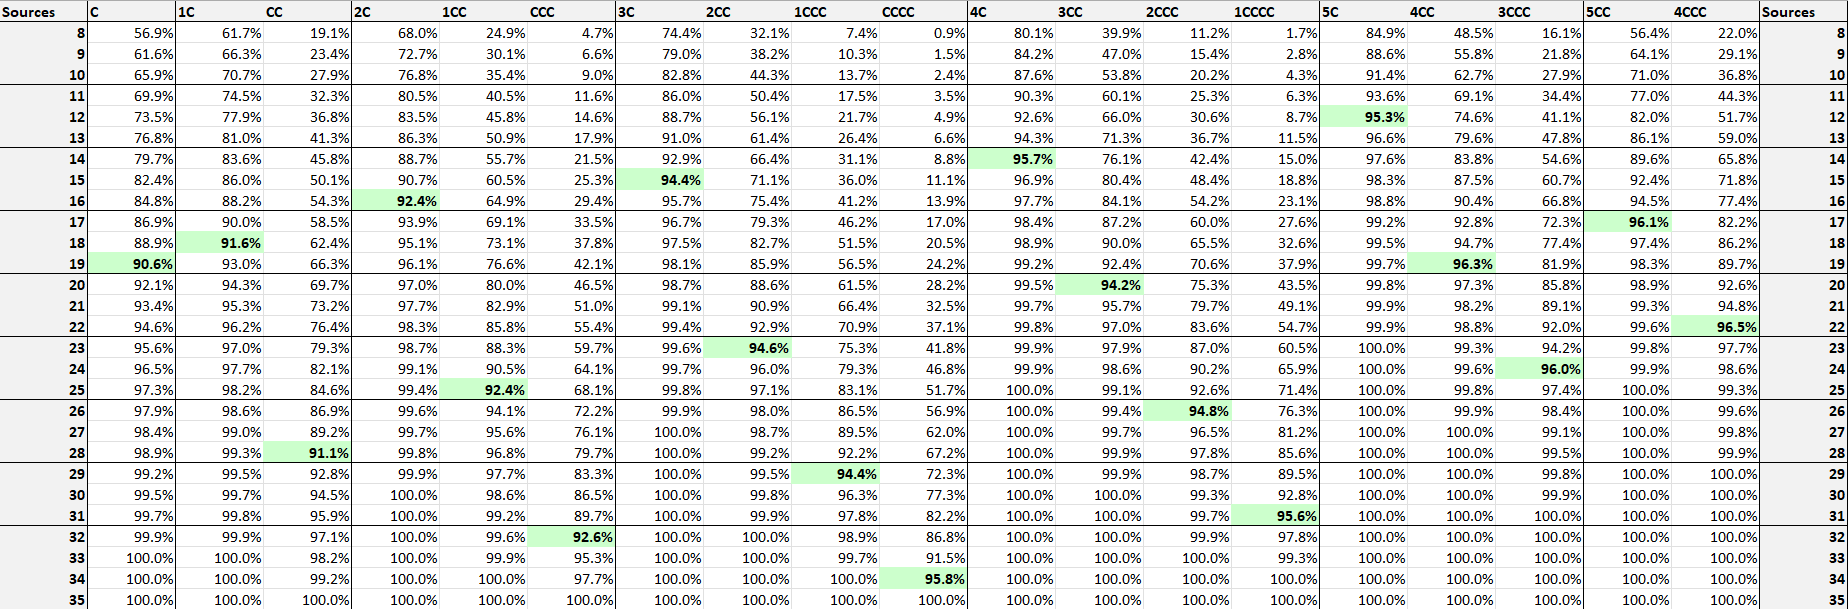
What this table doesn’t show, however, is how hard it is to cast, for example, a Teferi, Time Raveler. If you’re splashing it like I do in my Izzet midrange deck, you can simply evaluate it as having a single pip. Why? Because you will practically always have access to a blue source; the only trouble is knowing when you will have access to white mana. So, according to the table, if you want to cast your Teferi, Time Raveler on time, you would need to have 19 white sources, right? In the example of the mana base splashing two colours, I was able to comfortably achieve 13 mana sources of each splash colour with just the mana base. If you adjust it somewhat generously to include the fact that there should be a good number of nonland cards that help splash anyway, you can achieve roughly 15 effective on-colour mana sources. You might have realised that 15 sources is smaller than the 19 the table recommends. However, I argue that this is not as bad as it might seem as long as you do splash cards that are good throughout the game, not just on curve. If you’re fine with casting that Teferi on, say, turn five, then you’re already a lot closer to the ideal number of sources.
And that’s not all that’s in the splasher’s favour. Considering the number of cards a splash entails, you’re much more likely to see your fixing early than your splash cards. If you’re splashing four cards, there is a 50% chance that you won’t see any of them until turn 9, and at that point you’re overwhelmingly likely to have drawn the appropriate source of mana. And even at a measly 15 sources, the chance that you’re able to cast Teferi on turn three is still a solid 83% according to Karsten’s chart2.
 This isn’t ideal, but it’s still a reasonable chance. The number of times you will actually end up with a card stuck in your hand is not that big all in all, while the impact Teferi, Time Raveler has on the game can be game-winning even behind the curve.
Closing Words
In summary, splash cards should be powerful. They should be castable. They should be playable behind the curve. This is because, in more decks than you’d think, the manabase cost is small, and the upside is large. If you have questions, feel free to shoot me a direct message or otherwise ping me on the format Discord. These numbers draw from personal experience and may have a small sample size, so deviation is encouraged. Try things out, experiment with what and how you’re splashing, and (most importantly) have fun!
- The reason proportions are the significant factor instead of raw numbers is because in the simulations Karsten ran “non-games”, meaning games where not enough lands got drawn were discarded and not counted for the statistic. For example, if you want to cast a card that costs RRR and you run the simulation for three lands it will say that for ≥92% consistency you need 3 red sources because this guarantees that you have RRR on three lands every time. But if you run 40 lands, you will obviously need more than 3 red sources if you want to cast a RRR card when you have three lands.
- The numbers in the chart are for decks with 80 cards, so we need to adjust our number of sources. We do this by multiplying 15 by 80/100 which gives us 12 sources.